
 中国
中国
 India
India
 Việt nam
 Australia
 대한민국
대한민국
 پاکستان
 ประเทศไทย
 Filipino
 Malaysia
 Bangladesh
 Sri Lanka
 Indonesia
 Узбекистан
 Ireland
 Česká republika
 Türkiye
 United Kingdom
 France
 Deutschland
 Nederland
 España
 Sverige
 Italia
 Polska
 Україна
 Português
 България
 Magyarország
 Lietuva
 Ελλάδα
 Suomen tasavalta
 United States
 Canada
 México
 Brasil
 República de Chile
 South Africa
 المملكة العربية السعودية
 الجمهورية اللبنانية
 امارات عربية متحدة
 اليمن
اليمن
 المملكة الأردنّيّة الهاشميّة
 جمهورية مصر العربية
 la République Tunisienne
 Kenya
Kenya
 Tanzania
 Nigeria
 Other Countries and Regions
1. Background
Load Monitoring allows users to see what’s happening on their system in real time through the SolisCloud platform — including:
Load-side power and energy
Grid voltage, current, power, and energy
24-hour load monitoring (data is uploaded even at night)
This makes it much easier to understand household consumption and overall system behaviour.
This guide explains how to set up Load Monitoring using a CT clamp.
2. Applicable Inverters
Below are the inverter series which support the CT solution for the export power management and 24H load monitoring.
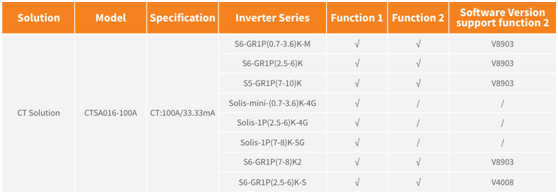
Function 1: Export Power Management
Function 2: 24-hour Load Monitoring
> Note: Function 1 (export control) automatically includes Function 2.
Important:
The CT solution is only suitable for systems with one inverter. For multi-inverter systems, use the EPM solution instead.
3. How To Use
1. Check Your Inverter
The CT method works only on Solis single-phase inverters with a built-in CT port.
Some versions have a Meter Port instead — confirm with your Solis sales representative before ordering.
2. CT Installation
The CT clamp is used to detect power flow at the grid connection point. If export power reaches the limit you set, the inverter will automatically reduce output.
Installation rules:
Clamp must be installed on the live (hot) wire at the grid connection point. The arrow on the CT must face towards the grid.Follow the wiring guidance shown in Solis documentation.
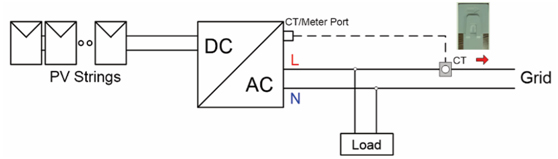
Cable connection of CT solution
3. Operation step
Below are the two setup methods depending on the function you want.
Function 1: 24-Hour Consumption Load Monitoring Only (Smart Sensor)
After installing the CT, follow the steps below to enable the 24-hour load monitoring function:
Step 1: Open “Internal EPM Set” on the inverter LCD screen
Advanced Settings → Password: 0010 → Internal EPM Set
Step 2: Select “LoadMonitor_CT” (Option 5)
Advanced Settings → Password: 0010 → Internal EPM Set → Mode Select → LoadMonitor_CT
Step 3: Enable the 24H Switch
Advanced Settings → Password: 0010 → 24H Switch → Enable
Step 4: Configure the Solis monitoring system
(Refer to the monitoring device manual)
---
Function 2: Export Power Management + 24-Hour Consumption Load Monitoring (Smart Sensor)
After installing the CT, follow the steps below to enable export power management together with 24-hour load monitoring:
Step 1: Open “Internal EPM Set” on the inverter LCD screen
Advanced Settings → Password: 0010 → Internal EPM Set
Step 2: Select “Current Sensor” (Option 6)
Advanced Settings → Password: 0010 → Internal EPM Set → Mode Select → Current Sensor
Step 3: Set the “CT Sampling Ratio” to 3000:1
Advanced Settings → Password: 0010 → Internal EPM Set → Mode Select → Current Sensor → CT Sampling Ratio → 3000:1
Step 4: Enable the 24H Switch
Advanced Settings → Password: 0010 → 24H Switch → Enable
Step 5: Set the Backflow Power Limit
Choose how much power your system is allowed to export to the grid.
Advanced Settings → Password: 0010 → Internal EPM Set → Backflow power
Step 6: Ensure “Failsafe ON/OFF” is set to ON
(Default is ON)
Advanced Settings → Password: 0010 → Internal EPM Set → Failsafe ON/OFF
Step 7: Configure the Solis monitoring system
(Refer to the monitoring device manual)
4.Conclude
Solis inverters with CT support can:
Monitor load consumption 24 hours a day, even at night
Control export power dynamically, adjusting inverter output to prevent unwanted export
Improve system stability and comply with local export-limit rules
For example, if your household load drops, the inverter will automatically reduce output so the system does not send power back to the grid.
2026-03-21 15:25:00.0


Get the latest news of Ginlong at the first time
Asia/Pacific
Europe
North America
South America
Middle East and Africa
Other Countries and Regions

